

The Art of Sourdough
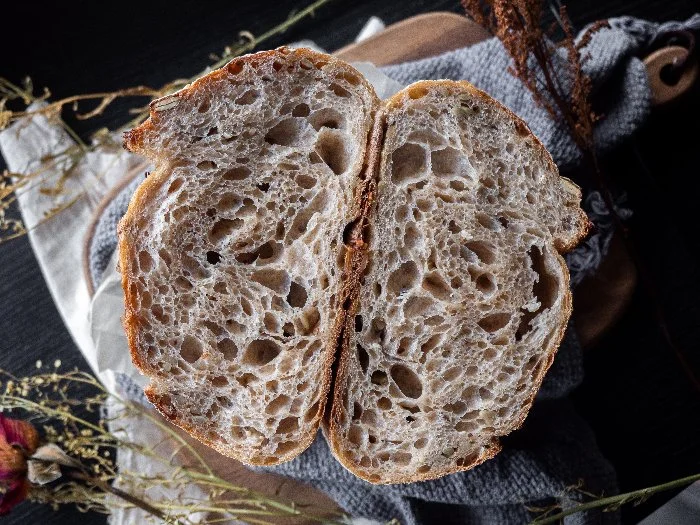
By Nathan Carey About halfway through each semester, with exams looming and assignment deadlines galore, I tend to procrastinate. I’m sure that I’m not alone in this sentiment. Some folks like to watch Netflix, read a book, or just spend a few hours doing absolutely nothing. While all valid, my escape of choice usually involves baking. It can be cakes, cookies, or other sweet treats but more often than not I’ll end up baking a loaf of bread. This process became almost ritualistic during the course of the pandemic, breaking up monotonous days of sitting at my desk from dawn until dusk. Baking bread lends itself perfectly to a work from home lifestyle – checking in on a rising dough every couple of hours, giving it a fold here and there. The rise of baking in quelling anxiety and filling the procrastination void was supported by worldwide yeast shortages in late 2020 and early 2021. This shortage led to its own interesting consequence, an explosion of homemade sourdough. If you’ve been following my articles through the last few issues, you’ve no doubt heard me rave and ramble about my love for fermented foods. Sourdough was one of my original entry points to this wonderful world of microbes. I would spend hours researching the methods and practices of a host of professional chefs, online content creators and anecdotes from everyday people on online baking forums. I started chronicling my sourdough adventure on Instagram and before long I had people messaging me about my starter and how I got my loaves to rise. While the process is fairly straightforward, there are so many variables that can affect the outcome of the final product. Here, I’d like to share some of my tips and techniques for perfecting a sourdough loaf.  The first ingredient in any loaf of sourdough is the starter. This is arguably the most difficult part of the process and is where most problems arise. The bread we usually eat is leavened using some form of fast-acting (usually dried) yeast. This yeast is concentrated and ready to lift any loaf in a matter of hours. In sourdough baking, starter takes the place of commercially packages yeasts. Starter is a mixture of water and flour that is left at room temperature and ‘fed’ for several days. This process allows naturally occurring yeasts present in the flour to grow and prosper and create a symbiotic community of wild yeast and lactic acid. When fed, the yeasts and lactic acid producing bacteria feed on carbohydrates in the flour and produce carbon dioxide, creating the characteristic bubbling of starter. Once acclimated, sourdough starter can last for months or even years. To begin, on Day 1 place 25 grams of flour into a jar or container with a lid. It’s best to use unbleached flour or organic as these blends are more likely to have more natural yeasts present. Add 25 grams of water and mix well. Place a lid loosely onto the container and leave it at room temperature for 24 hours. On Day 2 add 50 grams of flour and 50 grams of water into the container. Mix well and cover again for 24 hours. On Day 3 remove all but 50 grams of the mixture. Add in a fresh batch of 50 grams of flour and 50 grams of water. Mix well and cover for 24 hours. You may see the pattern that’s emerging here – feed, remove and feed again. This is the basic method of preserving your starter. Days 4, 5 and 6 will be the exact same as day 3, keeping 50 grams of mixture each time before adding the feed. As the days progress you will see the starter become bubbly and it will rise and fall in the container. This is indicative of an active starter. By Day 7 your starter should be ready to bake with. After baking, remember to feed your remaining starter. It can then be placed into the fridge and fed once a week. When you’re ready to use it again, take it out of the fridge and feed it for 3 days before baking. Ingredients
- 100g starter
- 300g strong white flour
- 1tsp salt
- 125g water
Method
- Add flour, starter, water and salt into a large bowl. Mix well by hand or use a stand mixer.
- If kneading by hand, tip out onto a floured work surface and knead for about ten minutes until the dough is soft and elastic and there are no dry spots remaining.
- To ensure the dough has been kneaded sufficiently, tear off a small bit and spread it out thinly between your fingers. If light can shine through the dough, it is kneaded enough. If the dough rips, continue to knead until it passes this ‘windowpane test.
- Place the dough into a lightly oiled bowl and allow to rest undisturbed for 3 hours.
- After 3 hours, knock the dough back out onto the counter and knead for 1 minute. Shape the dough into a tight boule and place it into a bowl (seam side up) lined with a clean dishtowel coated with flour (or use a proofing basket). Cover loosely with cling film.
- This second rise will take much longer than traditional bread, anywhere from 5-10 hours at room temperature. What I like to do is place it into the fridge and allow the dough to rise slowly overnight. If you use the fridge method take the dough out of the fridge 2 hours before you want to bake it.
- Preheat an oven to 220 degrees Celsius and place a baking tray and a smaller tray filled with water into the bottom of the oven. The tray full of water will create steam and allow the bread to rise evenly.
- When the larger baking tray is heated through, take it from the oven, dust with flour and carefully tip the boule of dough out onto it. Using a sharp knife slash lengthways across the top of the dough to give room for rising.
- Place the dough into the oven and bake for around 35 to 40 minutes until golden brown.
- Remove the loaf and allow to rest on a wire rack until completely cooled (around an hour).
If your starter doesn’t make the dough rise the first time around do not fret! When I started my sourdough journey I created some very dense frisbee-like loaves the first few times. Minimal rising is almost always linked to how active your starter is. To ensure a successful loaf, feed your starter roughly 2-3 hours before you plan on mixing the dough. This is when the starter is most active and the largest population of wild yeasts are present. Once you get the hang of things you can start customising your loaves with different flours or add-ins. Using some rye flour in place of white flour creates a nuttier, more complex flavour for example. If your loaves still aren’t coming out great, there are countless resources online to help you on your way. If you’re a fan of physical reading check out ‘Flour Water Salt Yeast’ by Ken Forkish. This book helped me immensely when I was getting started. Whether you get stuck in baking sourdough bread or just admire the work from afar, we can all agree on the satisfaction of creating something so tasty from 4 simple ingredients.---As always if you make any of the recipes featured in the Express, we would love to see them! You can post a picture on Instagram or Twitter with the hashtag #ExpressCooks.